Difference between revisions of "Categories/Refine Filters"
From Shopnix Help
m (→Where will I get Type Tag feature?) |
|||
| (12 intermediate revisions by the same user not shown) | |||
| Line 1: | Line 1: | ||
<div style="margin-top:50px"> | <div style="margin-top:50px"> | ||
| + | |||
==What is Type Tags?== | ==What is Type Tags?== | ||
<div style="justify"> | <div style="justify"> | ||
| − | Type tags build all the details of the product. | + | |
| + | Type tags build all the details of the product. Product tagging is the process of adding data to your products, including creating, assigning, and managing tags for each product to describe, categorize, and structure its position within your inventory. | ||
| + | |||
| + | |||
</div> | </div> | ||
| + | <youtube>Ts8negETvyQ</youtube> | ||
| + | </div> | ||
| + | <div style="margin-top:50px"> | ||
| + | |||
| + | ==Why do we need Type Tags?== | ||
| + | <div style="justify"> | ||
| + | |||
| + | Product tags used on a store's website helps identify product by type so it can easily be searched for and found on your online store. | ||
| + | Shopnix allows you to tag products as you add them to your online store. | ||
| + | |||
| + | |||
</div> | </div> | ||
<div style="margin-top:50px"> | <div style="margin-top:50px"> | ||
| + | |||
==Where will I get Type Tag feature?== | ==Where will I get Type Tag feature?== | ||
<div align="justify"> | <div align="justify"> | ||
| − | Go to | + | Go to '''STORE MANAGER > CATEGORIES''' |
| + | |||
| + | [[File:Cate.png|frameless|1200px]] | ||
| + | </div> | ||
| + | |||
| + | |||
| + | <div class="wiki-img"> | ||
[[File:AllProd.png|frameless|1200px]] | [[File:AllProd.png|frameless|1200px]] | ||
| + | </div> | ||
In the above figure [[Image:T2.png]] holds the Name and Values of the type. Suppose we want to add the tags for the Clothing and Apparel so click on the [[Image:T2.png]] in the row of Clothing and Apparel | In the above figure [[Image:T2.png]] holds the Name and Values of the type. Suppose we want to add the tags for the Clothing and Apparel so click on the [[Image:T2.png]] in the row of Clothing and Apparel | ||
| + | |||
| + | <div class="wiki-img"> | ||
[[File:t3.png|frameless|1200px]] | [[File:t3.png|frameless|1200px]] | ||
| + | </div> | ||
| + | |||
And we add some Name and Values ,after adding the values under Standard Tag Name and Default Value click on the [[File:AddBtn.png]] button. | And we add some Name and Values ,after adding the values under Standard Tag Name and Default Value click on the [[File:AddBtn.png]] button. | ||
| + | |||
| + | <div class="wiki-img"> | ||
[[File:t4.png|frameless|1200px]] | [[File:t4.png|frameless|1200px]] | ||
| + | </div> | ||
| + | |||
| + | <div class="wiki-img"> | ||
[[File:T5.png|frameless|1200px]] | [[File:T5.png|frameless|1200px]] | ||
| + | </div> | ||
| + | |||
Then go to PRODUCTS > ALL PRODUCTS, search the products (as per requirement where you want to add the tags) | Then go to PRODUCTS > ALL PRODUCTS, search the products (as per requirement where you want to add the tags) | ||
| + | |||
| + | <div class="wiki-img"> | ||
[[File:PreOrder2.png|frameless|1200px]] | [[File:PreOrder2.png|frameless|1200px]] | ||
| + | </div> | ||
| + | |||
| + | <div class="wiki-img"> | ||
[[File:T6.png|frameless|1200px]] | [[File:T6.png|frameless|1200px]] | ||
| + | </div> | ||
| + | |||
Click on the SKU of the product (example PROD001), under the Tags tab | Click on the SKU of the product (example PROD001), under the Tags tab | ||
| + | |||
| + | <div class="wiki-img"> | ||
[[File:T7.png|frameless|1200px]] | [[File:T7.png|frameless|1200px]] | ||
| + | </div> | ||
| + | |||
add the tags as shown in the above figure (as per the example). Now go to the Store's Clothing and Apparel section,in the left menu you can see the Tag Name and Tag Values. | add the tags as shown in the above figure (as per the example). Now go to the Store's Clothing and Apparel section,in the left menu you can see the Tag Name and Tag Values. | ||
| − | + | ||
| + | <div class="wiki-img"> | ||
| + | [[File:T8.png|frameless|1200px]] | ||
| + | </div> | ||
| + | |||
If you have more queries or would like assistance with this please contact us on [mailto:support@shopnix.in support@shopnix.in]. | If you have more queries or would like assistance with this please contact us on [mailto:support@shopnix.in support@shopnix.in]. | ||
</div> | </div> | ||
</div> | </div> | ||
Latest revision as of 23:11, 2 May 2022
What is Type Tags?
Type tags build all the details of the product. Product tagging is the process of adding data to your products, including creating, assigning, and managing tags for each product to describe, categorize, and structure its position within your inventory.
Why do we need Type Tags?
Product tags used on a store's website helps identify product by type so it can easily be searched for and found on your online store. Shopnix allows you to tag products as you add them to your online store.
Where will I get Type Tag feature?
In the above figure ![]() holds the Name and Values of the type. Suppose we want to add the tags for the Clothing and Apparel so click on the
holds the Name and Values of the type. Suppose we want to add the tags for the Clothing and Apparel so click on the ![]() in the row of Clothing and Apparel
in the row of Clothing and Apparel
And we add some Name and Values ,after adding the values under Standard Tag Name and Default Value click on the  button.
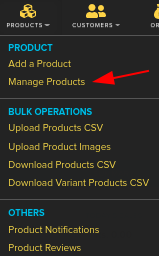
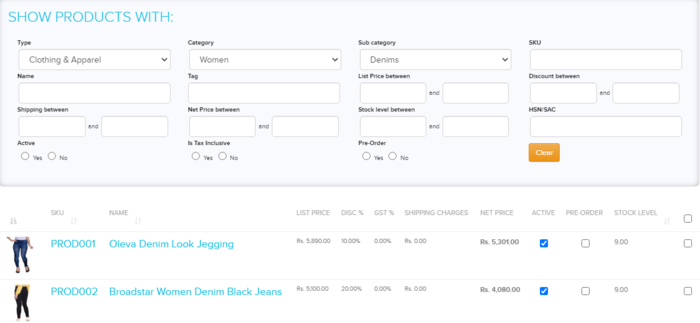
Then go to PRODUCTS > ALL PRODUCTS, search the products (as per requirement where you want to add the tags)
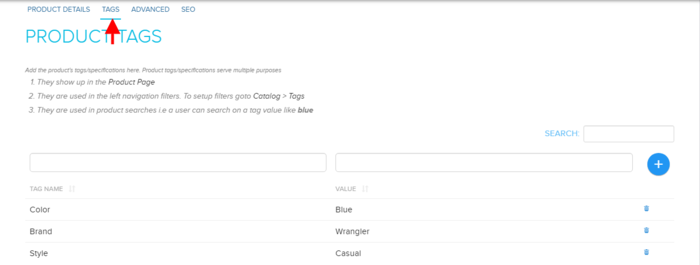
Click on the SKU of the product (example PROD001), under the Tags tab
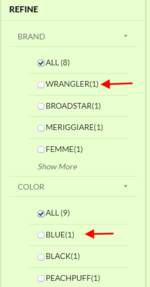
add the tags as shown in the above figure (as per the example). Now go to the Store's Clothing and Apparel section,in the left menu you can see the Tag Name and Tag Values.
If you have more queries or would like assistance with this please contact us on support@shopnix.in.


