Difference between revisions of "Order/Creating a custom order"
From Shopnix Help
m (→Creating a custom order.) |
|||
| (7 intermediate revisions by the same user not shown) | |||
| Line 1: | Line 1: | ||
<div style="margin-top:50px"> | <div style="margin-top:50px"> | ||
| + | <youtube>Ybq4rXJ-H6A&list=PL3w0UuU3__adObFbQzDfEleQeKlPbV-2B</youtube> | ||
==Creating a custom order. == | ==Creating a custom order. == | ||
<div align="justify"> | <div align="justify"> | ||
| Line 8: | Line 9: | ||
Go to Store Manager > Orders, click on the Add New Order button | Go to Store Manager > Orders, click on the Add New Order button | ||
| + | |||
| + | <div class="wiki-img"> | ||
[[image:order_add_new.png | frameless | 1200px]] | [[image:order_add_new.png | frameless | 1200px]] | ||
| + | </div> | ||
| + | |||
After clicking in the first tab fill all the details of the customer like below | After clicking in the first tab fill all the details of the customer like below | ||
| + | |||
| + | <div class="wiki-img"> | ||
[[image:order_summary.png | frameless | 1200px]] | [[image:order_summary.png | frameless | 1200px]] | ||
| + | </div> | ||
| + | |||
then click on the [[image:addbtn.png]] button. | then click on the [[image:addbtn.png]] button. | ||
| + | |||
| + | <div class="wiki-img"> | ||
[[image:order_add.png | frameless | 1200px]] | [[image:order_add.png | frameless | 1200px]] | ||
| + | </div> | ||
| + | |||
Under the Product Name column you can add a product as per the customer request like below | Under the Product Name column you can add a product as per the customer request like below | ||
| − | [[image:order_add1.png | frameless | 1200px]] and click on the [[image:order_add_button.png]]. | + | |
| + | <div class="wiki-img"> | ||
| + | [[image:order_add1.png | frameless | 1200px]] | ||
| + | </div> | ||
| + | |||
| + | |||
| + | and click on the [[image:order_add_button.png]]. | ||
| + | |||
Now move to summary tab, there you will find the details like below | Now move to summary tab, there you will find the details like below | ||
| + | |||
| + | <div class="wiki-img"> | ||
[[image:order_add2.png | frameless | 1200px]] | [[image:order_add2.png | frameless | 1200px]] | ||
| + | </div> | ||
| + | |||
In the payment tab you can add the payment type, Date as importantly you will get the payment link. You can send that link to the customer for online transaction. After adding click on the [[image:Savebtn.png]] button. | In the payment tab you can add the payment type, Date as importantly you will get the payment link. You can send that link to the customer for online transaction. After adding click on the [[image:Savebtn.png]] button. | ||
| + | |||
| + | <div class="wiki-img"> | ||
[[image:order_add3.png | frameless | 1200px]] | [[image:order_add3.png | frameless | 1200px]] | ||
| + | </div> | ||
| + | |||
Now in the shipping tab you can add the address of the customer like below. After adding click on the [[image:Savebtn.png]] button. | Now in the shipping tab you can add the address of the customer like below. After adding click on the [[image:Savebtn.png]] button. | ||
| + | |||
| + | <div class="wiki-img"> | ||
[[image:order_add4.png | frameless | 1200px]] | [[image:order_add4.png | frameless | 1200px]] | ||
| + | </div> | ||
| + | |||
| − | In the | + | In the Billing tab you can add the address, if your customer wants to send the order as a gift to an another person. After adding click on the [[image:Savebtn.png]] button. |
| + | |||
| + | <div class="wiki-img"> | ||
[[image:order_add5.png | frameless | 1200px]] | [[image:order_add5.png | frameless | 1200px]] | ||
| + | </div> | ||
| + | |||
| + | |||
| + | ==Why do we need Custom Orders ?== | ||
| + | <div align="justify"> | ||
| + | |||
| + | |||
| + | Custom Order means an order for Products that are commissioned, modified, personalised or customised, in accordance with your specific requirements. | ||
| + | |||
| + | </div> | ||
| + | </div> | ||
| + | <div style="margin-top:50px"> | ||
Latest revision as of 15:42, 10 February 2022
Creating a custom order.
The store owner can create an order behalf of the customer.
To get this feature
Go to Store Manager > Orders, click on the Add New Order button
After clicking in the first tab fill all the details of the customer like below
Under the Product Name column you can add a product as per the customer request like below
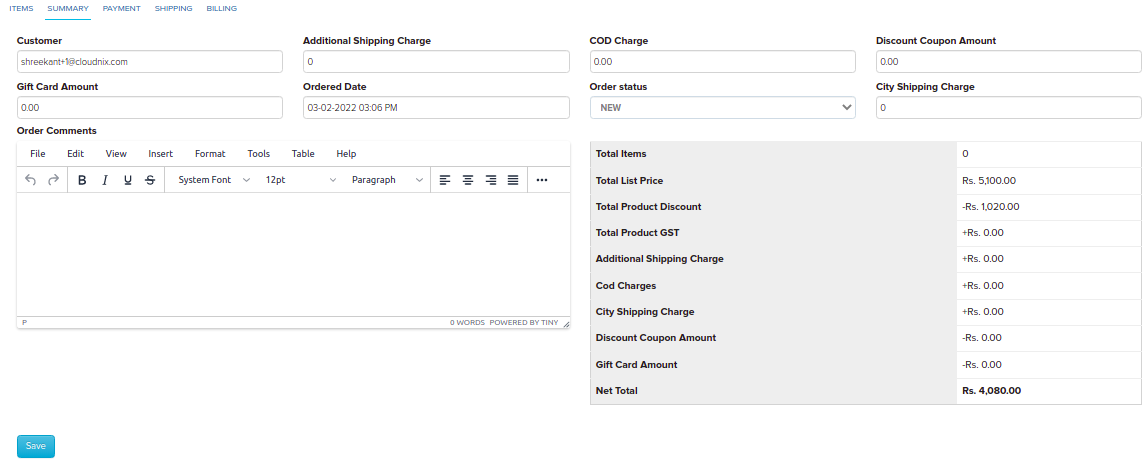
Now move to summary tab, there you will find the details like below
In the payment tab you can add the payment type, Date as importantly you will get the payment link. You can send that link to the customer for online transaction. After adding click on the ![]() button.
button.
Now in the shipping tab you can add the address of the customer like below. After adding click on the ![]() button.
button.
In the Billing tab you can add the address, if your customer wants to send the order as a gift to an another person. After adding click on the ![]() button.
button.
Why do we need Custom Orders ?
Custom Order means an order for Products that are commissioned, modified, personalised or customised, in accordance with your specific requirements.
If you have more queries or would like assistance with this please contact us on support@shopnix.in.


