Difference between revisions of "Setup/Cities-Add"
From Shopnix Help
m (→How to add cities ?) |
m (→How to add cities ?) |
||
| Line 7: | Line 7: | ||
| + | <div class="wiki-img"> | ||
[[Image:locationclick.png]] | [[Image:locationclick.png]] | ||
| + | </div> | ||
| Line 13: | Line 15: | ||
| + | <div class="wiki-img"> | ||
[[Image:locationcityclick.png]] | [[Image:locationcityclick.png]] | ||
| + | </div> | ||
| Line 21: | Line 25: | ||
| + | <div class="wiki-img"> | ||
[[Image:locationcityadd.png]] | [[Image:locationcityadd.png]] | ||
| + | </div> | ||
If you have more queries or would like assistance with this, please contact us on [mailto:support@shopnix.in support@shopnix.in] . | If you have more queries or would like assistance with this, please contact us on [mailto:support@shopnix.in support@shopnix.in] . | ||
</div></div> | </div></div> | ||
Latest revision as of 04:35, 4 February 2022
How to add cities ?
For adding Locations in your shop you need to follow below-
Go to Admin >Setup >Locations.
Then you will be redirected to States page. If you have already added the states, then you need to click on the city after the state name as shown in below image-
Otherwise you need to Add States.
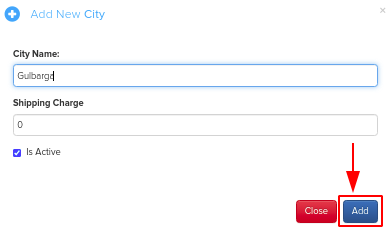
When you will click on the city you will be redirected to City page, there you need to fill the city name and click on add button as shown in below image-
If you have more queries or would like assistance with this, please contact us on support@shopnix.in .


