Difference between revisions of "Setup/Locations"
From Shopnix Help
m (→Why do we need Locations Feature ?) |
|||
| (7 intermediate revisions by the same user not shown) | |||
| Line 2: | Line 2: | ||
==What is Add Locations option?== | ==What is Add Locations option?== | ||
<div align="justify"> | <div align="justify"> | ||
| − | Add Locations option enables you to add different states,cities,areas etc to your store which will display during the | + | Add Locations option enables you to add different states, cities, areas etc to your store which will display during the checkout process. |
</div></div> | </div></div> | ||
<div style="margin-top:50px"> | <div style="margin-top:50px"> | ||
| − | ==Where I | + | |
| + | ==Why do we need Locations Feature ?== | ||
| + | <div align="justify"> | ||
| + | |||
| + | Location feature can be used for marketing, which involves smart work, more than it does hard work. When your store marketers collect, analyze, and use location data to customize promotions to customers, it creates better engagement and conversions, which translates into a return on advertising money. | ||
| + | |||
| + | </div> | ||
| + | </div> | ||
| + | <div style="margin-top:50px"> | ||
| + | |||
| + | ==Where Will I get Add Locations option?== | ||
<div align="justify"> | <div align="justify"> | ||
| − | For adding Locations in your shop you need to follow below- | + | For adding Locations in your shop you need to follow the below- |
Go to '''Admin >Setup >Locations.''' | Go to '''Admin >Setup >Locations.''' | ||
| − | In Shopnix there is a feature by which you can load all the Indian states in your shop for this you need to click on [[Image:load.png]] by default all the states will be active if want to change into inactive or active then you need to uncheck or check the box after the state name - | + | |
| − | + | <div class="wiki-img"> | |
| − | + | [[File:AdminLocation.png]] | |
| − | + | </div> | |
| − | + | ||
| − | + | ||
| + | In Shopnix there is a feature by which you can load all the Indian states in your shop for this you need to click on [[Image:load.png]] by default all the states will be active if you want to change into inactive or active then you need to uncheck or check the box after the state name - | ||
| + | |||
| + | |||
| + | |||
| + | <div class="wiki-img"> | ||
[[Image:active.png]] | [[Image:active.png]] | ||
| + | </div> | ||
| − | |||
| + | If you want to add another state then you need to fill the name of state and click on the Add button and follow the below- | ||
| + | |||
| + | |||
| + | <div class="wiki-img"> | ||
[[Image:states.png|724px]] | [[Image:states.png|724px]] | ||
| − | + | </div> | |
| + | |||
| + | |||
| + | If you want to add city in your state then you need to click on the City button after the name of state then in redirecting page you need to fill the city name and click on Add button as follows- | ||
| − | |||
| + | <div class="wiki-img"> | ||
[[Image:cities.png|724px]] | [[Image:cities.png|724px]] | ||
| + | </div> | ||
| + | |||
| + | If you want to add places in city then you need to click on the Area button after the name of city then in redirecting page you need to fill the Area name and Pincode and then click on Add button as follows- | ||
| − | |||
| − | |||
| + | <div class="wiki-img"> | ||
[[Image:area.png|724px]] | [[Image:area.png|724px]] | ||
| + | </div> | ||
| + | |||
If you have more queries or would like assistance with this, please contact us on [mailto:support@shopnix.in support@shopnix.in]. | If you have more queries or would like assistance with this, please contact us on [mailto:support@shopnix.in support@shopnix.in]. | ||
</div></div> | </div></div> | ||
Latest revision as of 22:40, 10 February 2022
What is Add Locations option?
Add Locations option enables you to add different states, cities, areas etc to your store which will display during the checkout process.
Why do we need Locations Feature ?
Location feature can be used for marketing, which involves smart work, more than it does hard work. When your store marketers collect, analyze, and use location data to customize promotions to customers, it creates better engagement and conversions, which translates into a return on advertising money.
Where Will I get Add Locations option?
For adding Locations in your shop you need to follow the below-
Go to Admin >Setup >Locations.
In Shopnix there is a feature by which you can load all the Indian states in your shop for this you need to click on ![]() by default all the states will be active if you want to change into inactive or active then you need to uncheck or check the box after the state name -
by default all the states will be active if you want to change into inactive or active then you need to uncheck or check the box after the state name -
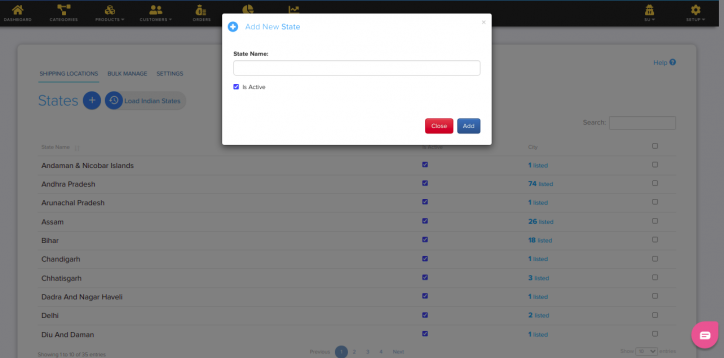
If you want to add another state then you need to fill the name of state and click on the Add button and follow the below-
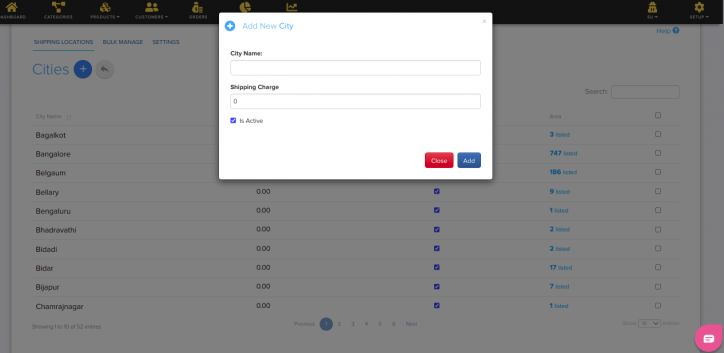
If you want to add city in your state then you need to click on the City button after the name of state then in redirecting page you need to fill the city name and click on Add button as follows-
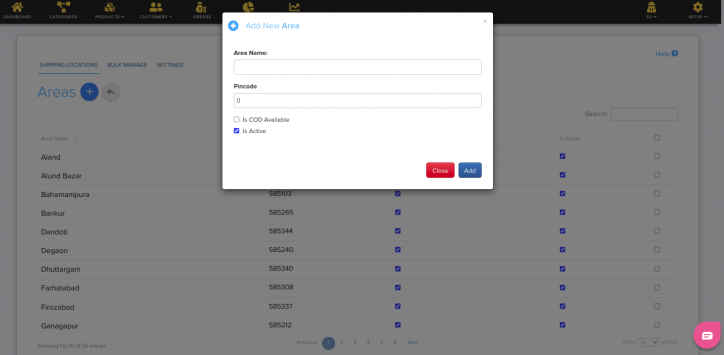
If you want to add places in city then you need to click on the Area button after the name of city then in redirecting page you need to fill the Area name and Pincode and then click on Add button as follows-
If you have more queries or would like assistance with this, please contact us on support@shopnix.in.


