Difference between revisions of "Setup/Shop Apps"
From Shopnix Help
m (→How to create Google App ID and Appsecret?) |
|||
| (12 intermediate revisions by the same user not shown) | |||
| Line 1: | Line 1: | ||
<div style="margin-top:50px"> | <div style="margin-top:50px"> | ||
| − | ==What | + | ==What are Shop Apps?== |
<div align="justify"> | <div align="justify"> | ||
| − | The Shop Apps | + | The Shop Apps are nothing but Facebook and Google login lets the customer sign in to the store via their respective facebook and google ID. |
</div></div> | </div></div> | ||
<div style="margin-top:50px"> | <div style="margin-top:50px"> | ||
| − | ==Where I | + | |
| + | ==Where can I access the Apps feature?== | ||
<div align="justify"> | <div align="justify"> | ||
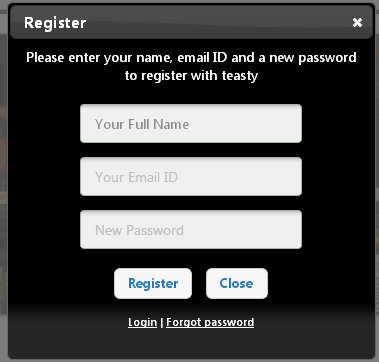
By Default your store is integrated with two apps Facebook and Google. shown below image- | By Default your store is integrated with two apps Facebook and Google. shown below image- | ||
| + | |||
| + | <div class="wiki-img"> | ||
[[Image:register.png]] | [[Image:register.png]] | ||
| + | </div> | ||
| + | |||
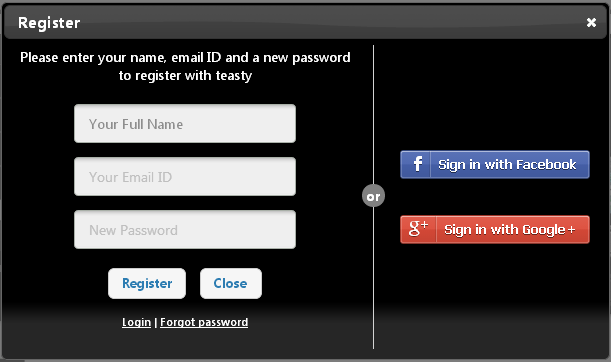
Shopnix provides a feature by which user can login by their Facebook Or Google account as shown below- | Shopnix provides a feature by which user can login by their Facebook Or Google account as shown below- | ||
| + | |||
| + | <div class="wiki-img"> | ||
[[Image:registerapps.png]] | [[Image:registerapps.png]] | ||
| + | </div> | ||
| + | |||
To enable these apps you need to follow below - | To enable these apps you need to follow below - | ||
| Line 19: | Line 28: | ||
Go to '''Admin >Setup >Apps.''' .Here you can enable and disable these apps by clicking the Enable Or Disable button as shown in below image - | Go to '''Admin >Setup >Apps.''' .Here you can enable and disable these apps by clicking the Enable Or Disable button as shown in below image - | ||
| + | |||
| + | <div class="wiki-img"> | ||
[[Image:enable.png]] | [[Image:enable.png]] | ||
| + | </div> | ||
| + | |||
After that you need to click on setting [[Image:sett.png]] button ( after the Enable and Disable button ) for filling the Appid and Appsecret . | After that you need to click on setting [[Image:sett.png]] button ( after the Enable and Disable button ) for filling the Appid and Appsecret . | ||
</div></div> | </div></div> | ||
<div style="margin-top:50px"> | <div style="margin-top:50px"> | ||
| − | == How to Create | + | |
| + | == How to Create Facebook App Id and Appsecret? == | ||
<div align="justify"> | <div align="justify"> | ||
1. Login with your credentials in https://www.facebook.com/. | 1. Login with your credentials in https://www.facebook.com/. | ||
| Line 31: | Line 45: | ||
3. Then click on the Apps option i.e. | 3. Then click on the Apps option i.e. | ||
| + | |||
| + | |||
| + | <div class="wiki-img"> | ||
[[Image:apps.png]] | [[Image:apps.png]] | ||
| + | </div> | ||
| + | |||
4. When you will click on the Apps option, it will show an option i.e. [[Image:developer.png]] click on that to accept the privacy policy(s) and then click on [[Image:next.png]] button. | 4. When you will click on the Apps option, it will show an option i.e. [[Image:developer.png]] click on that to accept the privacy policy(s) and then click on [[Image:next.png]] button. | ||
| Line 37: | Line 56: | ||
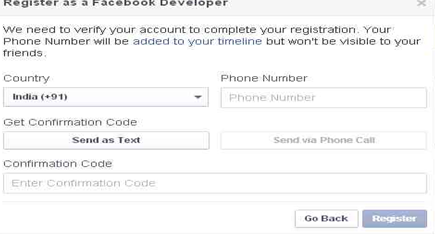
5. Fill the form | 5. Fill the form | ||
| + | |||
| + | <div class="wiki-img"> | ||
[[Image:registerform.png]] | [[Image:registerform.png]] | ||
| + | </div> | ||
| + | |||
| − | Click on the Register button and redirect you to a new page | + | Click on the Register button and it will redirect you to a new page |
| + | |||
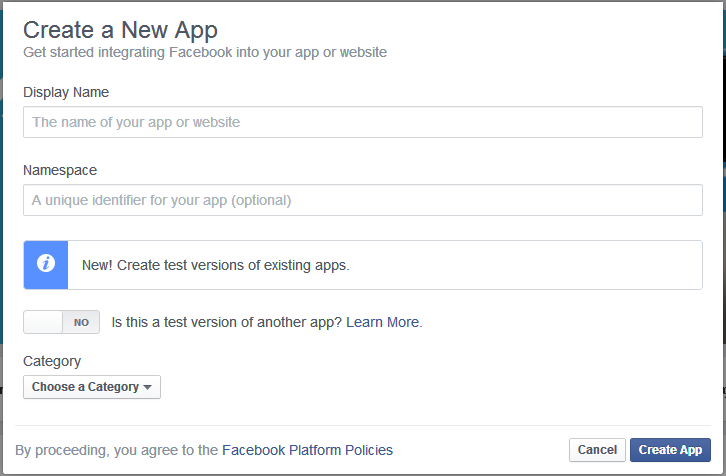
| + | Click on the [[Image:apps.png]] it will show you an option [[Image:createapp.png]] click on that. A pop will come out like below | ||
| − | |||
| + | <div class="wiki-img"> | ||
[[Image:newapp.png|frameless|1200px]] | [[Image:newapp.png|frameless|1200px]] | ||
| + | </div> | ||
| + | |||
| − | Fill the form i.e. Display Name, | + | Fill the form i.e. Display Name, Namespace (optional) and category. After that click on the “Create App” button, then fill the CAPTCHA. |
7. After that a new page (Dashboard) will come out. | 7. After that a new page (Dashboard) will come out. | ||
| Line 51: | Line 78: | ||
8. Click on the setting option as below | 8. Click on the setting option as below | ||
| + | |||
| + | <div class="wiki-img"> | ||
[[Image:dashboard.png]] | [[Image:dashboard.png]] | ||
| + | </div> | ||
| + | |||
After clicking on that a form will come out like below | After clicking on that a form will come out like below | ||
| + | |||
| + | <div class="wiki-img"> | ||
[[Image:dashform.png]] | [[Image:dashform.png]] | ||
| + | </div> | ||
| + | |||
| − | Click on the “+Add platform “option, a pop up will | + | Click on the “+Add platform “option, a pop up will come out like below |
| + | |||
| + | <div class="wiki-img"> | ||
[[Image:plateform.png]] | [[Image:plateform.png]] | ||
| + | </div> | ||
| + | |||
Click on the Website option. Then | Click on the Website option. Then | ||
| + | |||
| + | <div class="wiki-img"> | ||
[[Image:website.png]] | [[Image:website.png]] | ||
| + | </div> | ||
| + | |||
Then fill the Site URL i.e. Your shopping site’s URL and Mobile Site URL (Optional), provide the Email ID the Contact Email and click on the “save changes” button. | Then fill the Site URL i.e. Your shopping site’s URL and Mobile Site URL (Optional), provide the Email ID the Contact Email and click on the “save changes” button. | ||
| Line 69: | Line 112: | ||
9. Click on the dashboard option | 9. Click on the dashboard option | ||
| + | |||
| + | <div class="wiki-img"> | ||
[[Image:dashoptions.png]] | [[Image:dashoptions.png]] | ||
| + | </div> | ||
Click on the [?] option | Click on the [?] option | ||
| + | |||
| + | <div class="wiki-img"> | ||
[[Image:question.png]] | [[Image:question.png]] | ||
| + | </div> | ||
It will show an option like below | It will show an option like below | ||
| + | |||
| + | <div class="wiki-img"> | ||
[[Image:.chooseyn.png]] | [[Image:.chooseyn.png]] | ||
| + | </div> | ||
| + | |||
Click on the YES/NO option and make it YES. | Click on the YES/NO option and make it YES. | ||
| Line 87: | Line 140: | ||
10. Click on the Dashboard option like below | 10. Click on the Dashboard option like below | ||
| + | |||
| + | <div class="wiki-img"> | ||
[[Image:appon.png]] | [[Image:appon.png]] | ||
| + | </div> | ||
| Line 93: | Line 149: | ||
ADMIN > SETUP > Apps | ADMIN > SETUP > Apps | ||
| + | |||
| + | <div class="wiki-img"> | ||
[[Image:adminenable.png]] | [[Image:adminenable.png]] | ||
| − | + | </div> | |
| + | |||
Click on the Enabled/Disabled option [[Image:enable.png]] and make it “Enabled” and click on setting next to Enabled/Disabled option. And copy the App ID and Appsecret of Facebook page (i.e. as shown in 10) and place it like below | Click on the Enabled/Disabled option [[Image:enable.png]] and make it “Enabled” and click on setting next to Enabled/Disabled option. And copy the App ID and Appsecret of Facebook page (i.e. as shown in 10) and place it like below | ||
| + | |||
| + | <div class="wiki-img"> | ||
[[Image:filladmin.png]] | [[Image:filladmin.png]] | ||
| + | </div> | ||
| + | |||
</div></div> | </div></div> | ||
<div style="margin-top:50px"> | <div style="margin-top:50px"> | ||
| − | == How to create Google | + | |
| + | == How to create Google App ID and Appsecret? == | ||
<div align="justify"> | <div align="justify"> | ||
1. Login to the Google account by your credentials. | 1. Login to the Google account by your credentials. | ||
| Line 109: | Line 173: | ||
3. Click on Create Project. | 3. Click on Create Project. | ||
| + | |||
| + | <div class="wiki-img"> | ||
[[Image:createproject.png]] | [[Image:createproject.png]] | ||
| − | + | </div> | |
| + | |||
| + | |||
| + | 4. Write Project Name as your Shop Name and You need not edit Project ID field, and then click on create button. | ||
| − | |||
| + | <div class="wiki-img"> | ||
[[Image:proform.png]] | [[Image:proform.png]] | ||
| + | </div> | ||
5. Go to APIs & auth > Credentials. | 5. Go to APIs & auth > Credentials. | ||
| + | |||
| + | <div class="wiki-img"> | ||
[[Image:chooseoption.png]] | [[Image:chooseoption.png]] | ||
| − | + | </div> | |
| + | |||
| + | |||
6. Now click on – | 6. Now click on – | ||
| + | |||
| + | <div class="wiki-img"> | ||
[[Image:createnew.png]] | [[Image:createnew.png]] | ||
| − | + | </div> | |
| + | |||
| + | |||
7. Select Application Type – Web Application and give the Authorized Redirect URL and click on | 7. Select Application Type – Web Application and give the Authorized Redirect URL and click on | ||
[[Image:clientid.png]] Button. | [[Image:clientid.png]] Button. | ||
| Line 132: | Line 210: | ||
8. In redirecting page Appid = Clientid and Appsecret=Clientsecret | 8. In redirecting page Appid = Clientid and Appsecret=Clientsecret | ||
| − | 9. Now Go to Shopnix Store Admin > Setup > Apps. To | + | 9. Now Go to Shopnix Store Admin > Setup > Apps. To Enable Google account Registration. |
| + | |||
| + | <div class="wiki-img"> | ||
[[Image:enable.png]] | [[Image:enable.png]] | ||
| + | </div> | ||
| − | After | + | After enabling this feature you need to click on setting button, which will be redirected to you on Edit Shop App Google Login page- |
| + | |||
| + | <div class="wiki-img"> | ||
[[Image:fill.png]] | [[Image:fill.png]] | ||
| − | + | </div> | |
| + | |||
Here you need to fill the Appid and Appsecret now your shopnix store is ready to login with Google account. | Here you need to fill the Appid and Appsecret now your shopnix store is ready to login with Google account. | ||
If you have more queries or would like assistance with this, please contact us on [mailto:support@shopnix.in support@shopnix.in]. | If you have more queries or would like assistance with this, please contact us on [mailto:support@shopnix.in support@shopnix.in]. | ||
</div></div> | </div></div> | ||
Latest revision as of 19:10, 7 February 2022
Contents
What are Shop Apps?
The Shop Apps are nothing but Facebook and Google login lets the customer sign in to the store via their respective facebook and google ID.
Where can I access the Apps feature?
By Default your store is integrated with two apps Facebook and Google. shown below image-
Shopnix provides a feature by which user can login by their Facebook Or Google account as shown below-
To enable these apps you need to follow below -
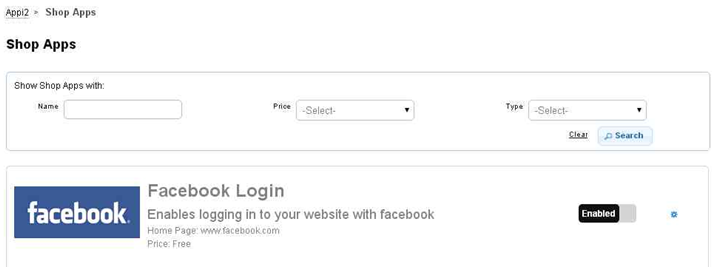
Go to Admin >Setup >Apps. .Here you can enable and disable these apps by clicking the Enable Or Disable button as shown in below image -
After that you need to click on setting ![]() button ( after the Enable and Disable button ) for filling the Appid and Appsecret .
button ( after the Enable and Disable button ) for filling the Appid and Appsecret .
How to Create Facebook App Id and Appsecret?
1. Login with your credentials in https://www.facebook.com/.
2. Then go to the link https://developers.facebook.com/.
3. Then click on the Apps option i.e.
4. When you will click on the Apps option, it will show an option i.e. ![]() click on that to accept the privacy policy(s) and then click on
click on that to accept the privacy policy(s) and then click on ![]() button.
button.
5. Fill the form
Click on the Register button and it will redirect you to a new page
Click on the ![]() it will show you an option
it will show you an option ![]() click on that. A pop will come out like below
click on that. A pop will come out like below
Fill the form i.e. Display Name, Namespace (optional) and category. After that click on the “Create App” button, then fill the CAPTCHA.
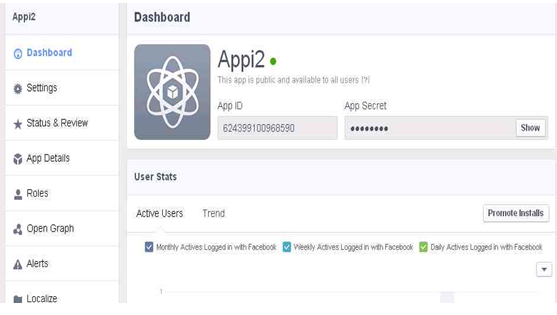
7. After that a new page (Dashboard) will come out.
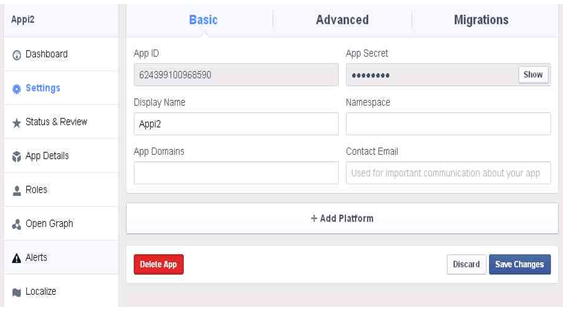
8. Click on the setting option as below
After clicking on that a form will come out like below
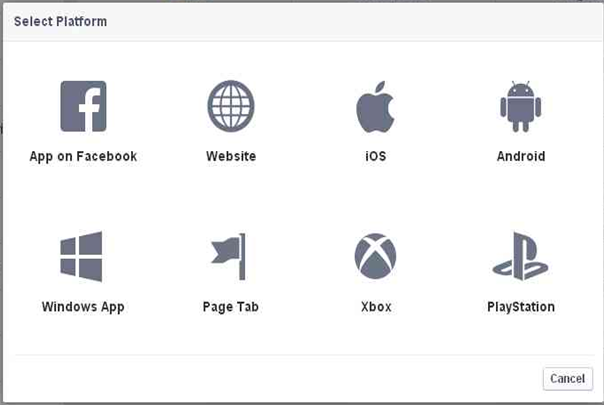
Click on the “+Add platform “option, a pop up will come out like below
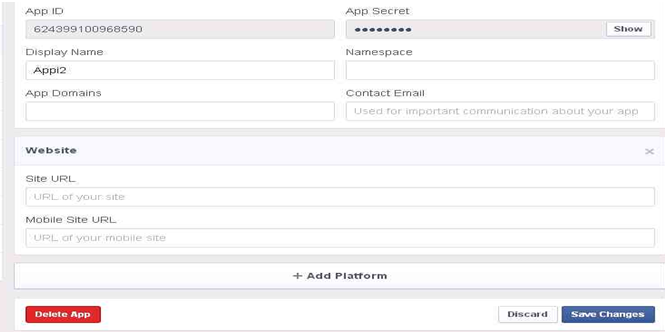
Click on the Website option. Then
Then fill the Site URL i.e. Your shopping site’s URL and Mobile Site URL (Optional), provide the Email ID the Contact Email and click on the “save changes” button.
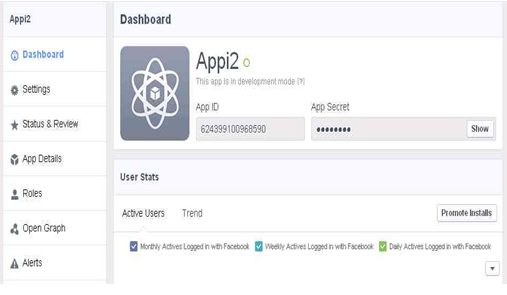
9. Click on the dashboard option
Click on the [?] option
It will show an option like below
Click on the YES/NO option and make it YES.
Then a popup will emerge click on “confirm” button.
10. Click on the Dashboard option like below
And copy the App ID and go to the
ADMIN > SETUP > Apps
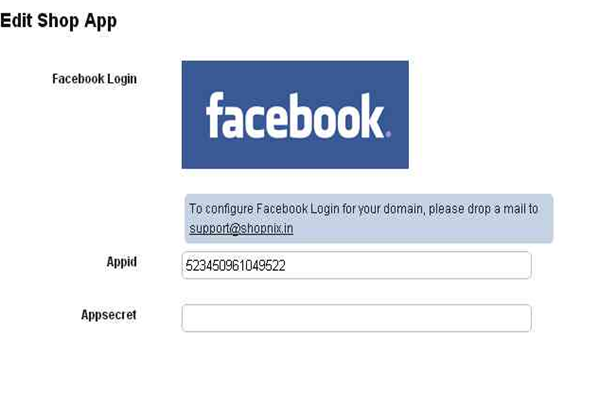
Click on the Enabled/Disabled option 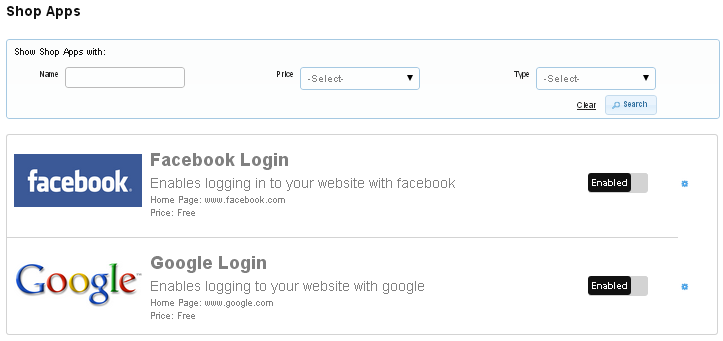 and make it “Enabled” and click on setting next to Enabled/Disabled option. And copy the App ID and Appsecret of Facebook page (i.e. as shown in 10) and place it like below
How to create Google App ID and Appsecret?
1. Login to the Google account by your credentials.
2. Go to http://console.developers.google.com/project .
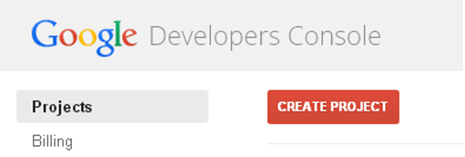
3. Click on Create Project.
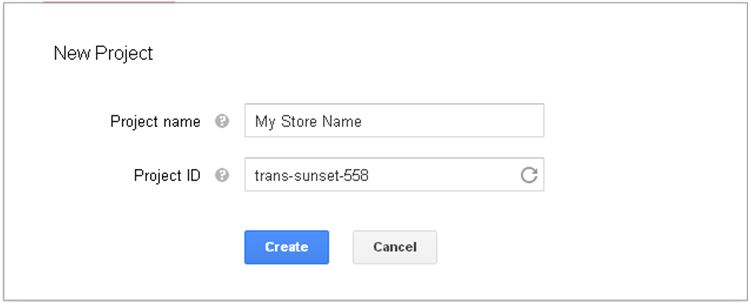
4. Write Project Name as your Shop Name and You need not edit Project ID field, and then click on create button.
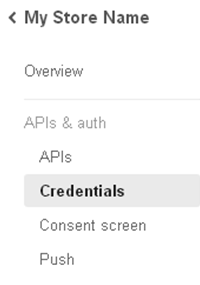
5. Go to APIs & auth > Credentials.
6. Now click on –
7. Select Application Type – Web Application and give the Authorized Redirect URL and click on
![]() Button.
Button.
8. In redirecting page Appid = Clientid and Appsecret=Clientsecret
9. Now Go to Shopnix Store Admin > Setup > Apps. To Enable Google account Registration.
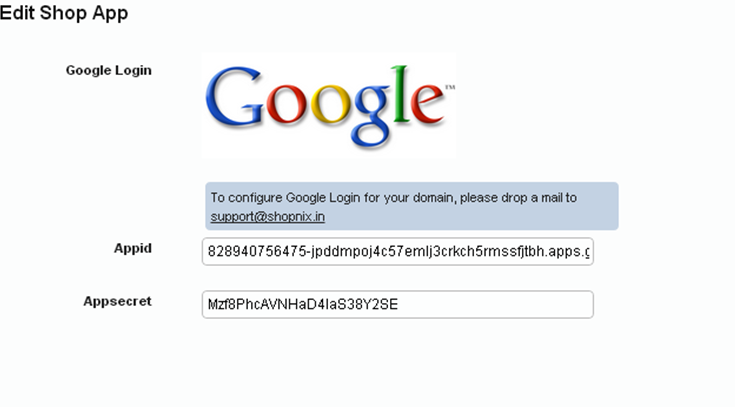
After enabling this feature you need to click on setting button, which will be redirected to you on Edit Shop App Google Login page-
Here you need to fill the Appid and Appsecret now your shopnix store is ready to login with Google account.
If you have more queries or would like assistance with this, please contact us on support@shopnix.in.

