Difference between revisions of "Upload Store banners"
From Shopnix Help
| Line 8: | Line 8: | ||
Store Manager > [[Image:AdminTab.png|middle]] > [[Image:ThemeTab.png|middle]] > [[Image:HPBTab.png|middle]] | Store Manager > [[Image:AdminTab.png|middle]] > [[Image:ThemeTab.png|middle]] > [[Image:HPBTab.png|middle]] | ||
| − | This section displays the banners that are currently being used on your Store. To change them click on the [[Image:ChooseFileButton.png|middle]] button and select the banner from your local PC to be uploaded. Click | + | This section displays the banners that are currently being used on your Store. To change them click on the [[Image:ChooseFileButton.png|middle]] button and select the banner from your local PC to be uploaded. Click Save button after uploading all your banners. |
Shopnix currently supports banners of size 740 pixel wide x 280 pixel high. Ensure that your banners of the same size, else they will look stretched or compressed after the upload. | Shopnix currently supports banners of size 740 pixel wide x 280 pixel high. Ensure that your banners of the same size, else they will look stretched or compressed after the upload. | ||
Revision as of 17:15, 7 September 2012
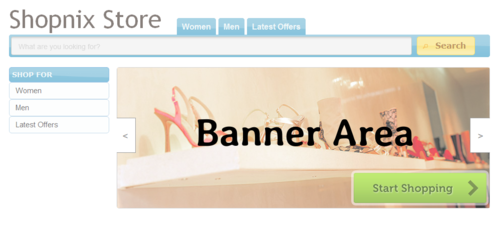
The landing page of your store has a Banner area where you can display banners related to your store. The screenshot below displays the Banner Area on the Burrows theme.
The Azkaban theme also has a Banner Area on its landing page.
You can upload upto 5 banners for your store. To do this goto
This section displays the banners that are currently being used on your Store. To change them click on the ![]() button and select the banner from your local PC to be uploaded. Click Save button after uploading all your banners.
button and select the banner from your local PC to be uploaded. Click Save button after uploading all your banners.
Shopnix currently supports banners of size 740 pixel wide x 280 pixel high. Ensure that your banners of the same size, else they will look stretched or compressed after the upload.

